CCRSoftware Support

How To Add a Filter to CCRQBOM Reports

There are times when you want to remove certain items from a report in CCRQBOM. To do this you would use a filter, which is easy to add to report definitions. Let’s take a look at a couple of examples.

To start with, I have a very simple assembly item. It consists of two inventory parts and one non-inventory part.

For my first example, I would like to list only the inventory part items in a requirements report that includes this assembly.

Here is a requirements report for a quantity 2 of this assembly.

To edit this report, I will select Forms and then Requirements.

Then I will select the Requirements List report template, and click the Edit button.

In the report editor select Report Explorer and select DetailReport,  since we want to filter the component items in the detail section of the report. Then select the Property Grid. Scroll down to find the Filter String property.

If you click on the right end of the Filter String field an ellipsis (…) will appear, and you will click that to open the FilterString Editor.

Click on the + symbol in the editor, which will add a filter line that you can edit. The filter line has three sections, each in a different color. The blue field is the data field, the green field is the operation, and the gray field is the value. Clicking on each field will allow you to change the filter details. There are several ways that you can manipulate a filter, in our example I want to include every field that is not a non-inventory part.

The data field that I will select from the dropdown list is Type. Note that if you don’t see this data field as an option, you probably haven’t selected the proper section of the report in the Report Explorer. 

The operation that I will select is Does not equal.

The value that I will enter is NonInventory.


Click OK to save the filter. Click File and then Save As to save the report, and give it a unique name. Then close the report editor.

Now when I run the Requirements report, I will select my modified report. As you can see, the Non-inventory part item is not included.

Another example would be to remove a particular part from the report. Let’s say that I want to remove the “Widget” item from the report as shown at the top of this article. I’ll go through all the same steps as above, and create the following filter:

This time I decided to exclude all items that match the condition by changing the red “And” to a “Not And”.

Here’s the report:

The most difficult issue with filters is selecting the proper section of the report. For some reports you will select the overall report, for any report that has a master/detail relation you often will want to select the detail section. If you can’t find the Filter String property then you have selected the wrong section of the report. Note also that not all fields are available in each section of the report.

The QuickBooks Administrator has not given permission

In some cases, when you start a CCRSoftware product you may see an error message similar to the following: Cannot open company file (Session:1009,0) Cannot open this QuickBooks Company. This application does not have permission to access this QuickBooks company data file. The primary issue here is that the QuickBooks admin user has not given permissions to our product to work with this particular QuickBooks company file. Keep in mind that these permissions are set per company file, so you will need separate permissions for each file.

Ask your QuickBooks admin user to perform these steps to resolve this issue:

  1. Run QuickBooks as the Admin user and open the QuickBooks file that you want to work with.
  2. Select Edit from the QuickBooks main menu, then Preferences.
  3. In the Preferences window, select Integrated Applications in the left menu.
  4. Select the Company Preferences tab.
  5. Make sure that the Don’t allow any applications to access this company file box is not checked.
  6. Locate the CCRSoftware product in the list of applications. Make sure that the Allow Access column has a check mark by the application name. In the screen shot below, CCRQInvoice does not have the box checked, and that is what is preventing the program from accessing this file. Click once in that column to add a check mark.
  7. Click OK to close the window, and exit QuickBooks

That normally will resolve the problem.

In some cases you may continue to have problems. Here are a few additional considerations:

  • Sometimes you may find that there are several instances of the same CCRSoftware product in the application list. This occurs if you have installed an updated version – both the original and the update will be listed separately. Make sure that all instances of the program have the allow access column checked.
  • In rare occasions there may be some data corruption in your QuickBooks company file, due to issues that have nothing to do with the add-on program. To resolve this, locate the CCRSoftware application in the list, select it, and click the Remove button to remove it from the list. Remove all instances of the CCRSoftware product that you are using. Then, exit QuickBooks and restart it (as the Admin user). Run the CCRSoftware product again, and you should be asked if you want to allow our product to access your file. It is important to answer Yes, whenever this QuickBooks company file is open.

These steps resolve 99.99% of the issues we’ve seen that generate the error. If it does not, this indicates that you may have some file corruption in your QuickBooks file and that you should consider a “file rebuild” process to clean up your file. Please consult with a qualified QuickBooks ProAdvisor before proceeding, and always make a backup copy of your file before running a File Rebuild process.

Adding a Page Break to the BOM Listing

The Mult-Build function of CCRQBOM version 3.2.2 (Assemblies function in version 3.6.0 and later) has an option to print multiple assemblies in one report. The standard report is designed to print the BOM’s in a compressed format, to save paper, by not having page breaks between each assembly. Let’s look at how you can add a page break between assemblies. Note that we’ll be using version 3.2.2 as an example, the process is very similar for version 3.6.0 and later.

Here’s my sample MultiLevel BOM listing (with some very simple data).


To edit this report, select Forms then Bill of Material.

In the Edit Reports window select “Multi Level BOM” and then click the Edit button. Note that the editor may be slow to open, so be patient.

Select the “DetailReport” band by clicking on the band in the editing window, or in the Report Explorer.


In the Property Grid box, scroll down to find the Page Break property (make sure that “DetailReport” is the selected object at the top of the window. Change that property to After the Band.

Select File in the editor menu, then Save As to save this edited report. Give it a unique name. Then close the editor window.

Now when you print the report you should see the new report template that you created in the report list. Here’s the results with my sample data. Each of the BOM’s has a separate page.

CCRQInvoice Won’t Process Orders

If you are using CCRQInvoice and you can’t get the program to process orders for you, here’s a checklist to go through to help resolve the problem.

This assumes that you have connected the program to your QuickBooks company file and that you aren’t getting any error messages. If you are getting an error message then you can search this website for information on the particular error. If you can’t find your error, send us diagnostic information.

 Open QuickBooks Company File Menu

If you just get this window, then one of several things have occurred:


  • Your QuickBooks company file isn’t open yet. Open it before you run CCRQInvoice.
  • You haven’t told QuickBooks that it is OK to access this file. This must be done by the QuickBooks admin user. See the installation documentation for details on setting things up.
  • There was some kind of error message preceding this. Look for a description of the error message or send us diagnostic information.

All Menu Options are Gray

If you open CCRQInvoice and all options are grayed out, this means you aren’t connected to the QuickBooks company file. The remedies are the same as listed in the Open QuickBooks Company File Menu section above.

Processing Options are Grayed Out

If you open the Order Processing window and you cannot select the option you want because it is grayed out, that means that you haven’t set up preferences for this company file. Note that this also can happen if you change your Company Name in the QuickBooks My Company information section.


To correct this, select Preferences in CCRQInvoice, then click the button by Parameter Wizard.

When you get to the Processing Options screen, choose the option you wish to enable.

Your Orders Aren’t Sorting or Totaling

OK, so everything seems to work so far, but nothing happens! You can open CCRQInvoice without an error, your preferences are all set, but nothing happens?

First of all, remember that if you set up totals, the totaling won’t happen automatically. You have to run the Order Processing function, load your orders, select your options and then click one of the Process buttons. This is described in the documentation. New users sometimes expect it all to happen automatically, but Intuit won’t let us work that way.

If that still doesn’t work, the most common issue is that you have multiple conflicting options. If you have enabled multiple processing options and several of them are sharing the same custom fields, they may interfere with each other. Make sure you don’t have different options using the same custom fields.

Another possibility is that you are trying to process an order that is open in QuickBooks. Don’t have the order open in QuickBooks when processing it, since QuickBooks has placed a lock on the order to prevent our program from updating it at the same time.

Beyond that, there are a number of potential (but not common) problems that can cause an issue. Again, we are assuming that you are not getting any error messages, then you can send us some diagnostic information. At this point we need a log file where you process a single invoice. Don’t process multiple invoices, that makes it too hard to identify the problem. The procedure for setting up a log file and sending it to us is outlined in this article about how to send us diagnostic information.

Object reference not set to an instance of an object

Sometimes people run into this cryptic error message, “Object reference not set to an instance of an object”

This is confusing, and uninformative.

What happens is that you are running into some error, such as the Cannot open/create a parameter file error, and then clicking the “Continue” button to move on. Because of the first error, the program hasn’t been set up correctly in memory, and when you try to access some function of the program you may get this second error.

The real cause of the problem you are having is the first error. The second error, the “object reference” error, just means that the program has run into issues and can’t figure out what to do.

So what we need to see is that first error.

Unfortunately, there is one copy of the “error.pdf” file created at a time. When you get the first error, that is saved to the error.pdf file. Then you click “Continue” and the second error occurs, which creates a new error.pdf file that overwrites the first one. If you then locate that file and send it to us, we get the meaningless error information and cannot help you.

Two ways to resolve this:

  1. Exit the program and try again. When you get the first error, stop, don’t continue. Locate the error.pdf file that was created and send that to us. Once you have saved that file, then you can continue. You’ll get the error, just exit the program. You can examine the details of that first error message for help.
  2. Alternately you can set up the log file to save more information. See the article on getting detailed diagnostic information.

Revoked Certificate Errors

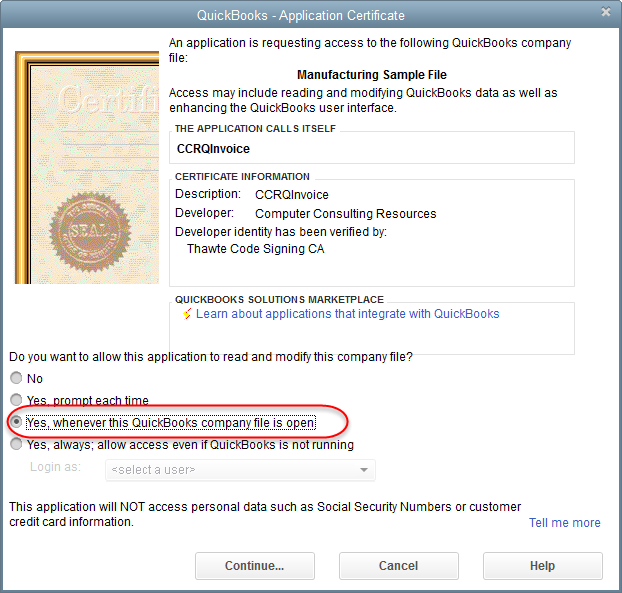
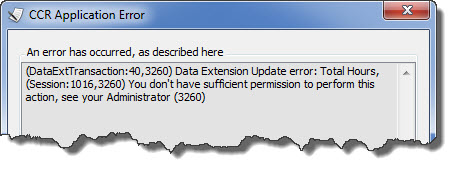
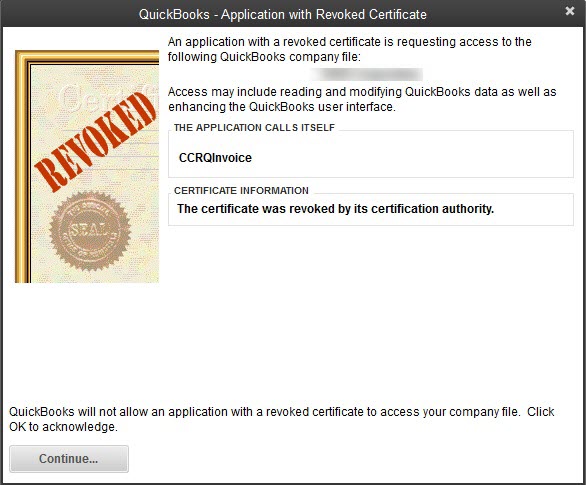
Under certain circumstances QuickBooks may display an error when you start a CCRSoftware product, “Application with Revoked Certificate”, similar to the one shown here.

This error prevents you from running the program. Note that if you try to run the CCRSoftware product again, after this, you may get a different error (probably something about the admin not giving permission to this program).

Why Did This Happen?

The explanation of why this error occurs is very long and complicated. I’ll try to summarize the main points:

    • Software products can be “code signed”, which gives them a “certificate” that authenticates that the program is created by a real, not bogus, company.
    • Once a certificate is issued to a developer it is supposed to last FOREVER.
    • Some years ago one of the very widely used certificate issuing companies messed up and sold certificates without checking that the companies were valid.
    • Microsoft decided to “revoke” the certificates from that company. So ALL certificates from this time were invalidated, even those for companies (like CCRSoftware) were considered to be legit.

Unfortunately, Microsoft didn’t announce the “revoke” process, they just did it, and suddenly a wide range of software products stopped working with QuickBooks. Even some of those created/sold by Intuit. No advance notice! This occurred late in August 2023. Panic!

A few days after this occurred, Microsoft revalidated the revoked certificates (again without telling anyone). All the software products started working again. HOWEVER, at the time I’m writing this (8/30/2023) we don’t know how long this will last. I anticipate that Microsoft will revoke the certificates again.

Fixing the Revoked Certificate

Unfortunately, CCRSoftware is no longer able to create new releases of our products. This means that we cannot create versions that have an updated certificate. However, for MOST of our customers, there is a fix. It is complicated – you may need a computer system technician to help you implement this.

Note that at this time we aren’t able to fully test these solutions, since we cannot duplicate the “revoked certificate” issue after Microsoft pulled it back. We have to wait until Microsoft decides to revoke them again. But we have a reasonable expectation that these steps will work.

There are two files that are signed with certificates that may be revoked. One is the “executable” file for our program, such as CCRQInvoice.exe. The other is a file provided by Intuit, interop.qbmlrp2.dll.

We have little control over the Intuit dll file, although in some circumstances we have been able to remove the certificate error. Hopefully our fix will resolve THEIR portion of the problem.

As for CCRSoftware products, we have been able to update our certificate and create a new executable for many of our products. After installing our product on a system (or, with a system where our product is already installed), you can replace the program executable with our updated version. This might be a bit technical for some users, our apologies. We have limited ability to assist with this process, but a knowledgeable Windows expert should be able to follow the procedure.

Here are the files that are available at this time. These are “zip” files, you will need to download them to your system and unzip them. There is a “readme.txt” file in the zip file that lays out the procedure you must follow, which varies depending on which product you are working with. Note that you will need Windows Admin permissions to copy files into these locations. Do this for every workstation that has our software installed.

Note that it is VERY important that you keep a copy of your original installer, a copy of this zip file, and a written copy of your serial number, in a safe place in case you will need to reinstall the software on another computer at a future date. We cannot guarantee that all of these files will be available from our website in the future. The zip file is NOT a complete installer. You would need to use the original installer to install the program, THEN update that installed program with the files from the zip file. Please make a backup of the original installer, the update zip file, AND your registration/serial number.

Here’s the list of file updates. Note that some products have multiple versions listed. It is IMPORTANT that you download the file for the version that your license/serial number matches.

There are two kinds of serial numbers.

    • Standard Release: Your registration key will be in the format XXXXX-XXXXX-XXXXX-XXXXX  (doesn’t start with “STD”)
    • Pre Release:  Your registration key will be in the format STD-XXXXX-XXXXX-XXXX-XXXX

If your software is not on this list, we might not be able to provide you with an update. However, contact us to discuss the situation. Note that a response may take several days, our apologies.

Files listed here are ZIP files. Download them, unzip them on your system, open the “Readme.txt” file for specific instructions.

After You Place the Updated Files

After updating the files you need to connect the updated program with QuickBooks. QB will notice that this is a changed file.

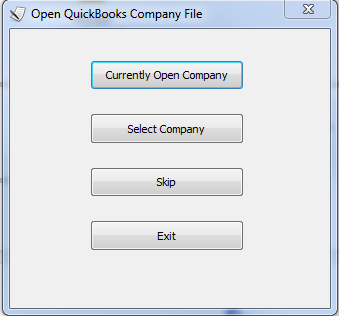
Open QuickBooks as the Admin user.

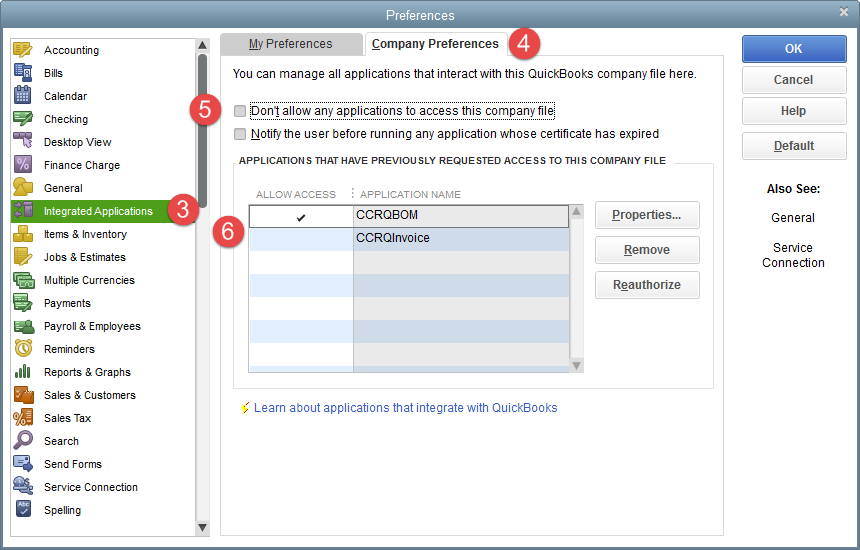
Run the CCRSoftware product. Since the certificate has been updated, you will be asked if it is OK for this product to access your file (just the same as the first time you used our product). Select “Yes, whenever this QuickBooks file is open”.

Note on Interop.QBXMLRP2.dll

This file is provided by Intuit. It is used by Intuit features as well as many different add-on products. It is “signed”, and possibly with one of the revoked certificates. So it must be updated.

The problem is, there are many versions of this file. CCRSoftware products need a specific version, which must reside in a specific location. If you search for this file on your computer you may find MULTIPLE copies, only one of them works with our product (and, different versions of it with different products of ours).

Intuit will sign the file with a new certificate and install it if you have a CURRENTLY SUPPORTED version of QuickBooks, with the most recent update. But that might not be the version that our software needs.

For SOME of our products we are providing you  with an unsigned version of the dll file, which should take care of the problem, but it is important to install it in the correct location as specified in the readme.txt file. Note that some of our products do not require an updated file.


Moving CCRSoftware Programs to a New Computer

It isn’t unusual for someone to contact us to ask for help in moving their CCRSoftware product from one computer to another. They could have purchased an upgraded system, or the prior system could have failed and needed replacement. Moving isn’t terrible difficult, but you have to pay attention to the details if you want it to go smoothly. Here’s how to approach the task.

Preparation

To install the software on a new computer you need a copy of the “installer” program. Hopefully you kept a copy of this when you made your initial purchase, but that often isn’t the case. If you don’t have that and you have a standard version of CCRQBOM or CCRQInvoice, go to our website and select the product, then select the “Download Free Trial” link. On that page you will find a copy of the installer program.

Note that in some cases you may have a special version that isn’t found on these pages – in this case you need to contact our support department to get a copy of the installer.

The other thing that you need is a copy of your registration key (also referred to as a serial number sometimes). If you don’t have that saved somewhere, if you can still run the program on the old computer, select Help and then About, and your serial number will be displayed.

The next step is to decide if this is a single user installation, or a multiple user installation. Your “preference” selections, which guide how the program works, are stored in some files – if you have a single user installation then most likely these files are on your local computer, but if you have a multiple user installation they should be stored on a place where all users can share them (not on your local computer). So, you need to know if this is a single or multiple user installation.

Locating your Preferences and Report Templates

Your preferences are stored in a file named “CCRQ.XML”. If you have created any customized form or report templates, these are stored in files that have a file type of “repx”. These files all exist in the same location. You may need to move these from the old system to the new one, particularly if this is a single user installation.

If you still have access to the old computer where the program is being moved from, then run the program and select Help and then Status. This will open a window like the following (there may be some variations).


Scroll down the window, and look for the “Common Path” setting. You can either drag the window wider, or hold your mouse cursor over the setting, to see the value. This is where your preference and report files are located.

If this is a single user setup then most likely these will be on a local (C: ) drive. If that is the case, go to this folder location, locate the CCRQ.XML file and any *.repx files there (there might not be any repx files), copy these over to a folder on your new computer.

Note that if the location is on a shared drive, like on your file server, you don’t have to move these files. Just remember where they are located.

Installing and Setup

Now, on the new computer, run the installation program. The program asks a series of questions, for the most part you will just accept the default answer. At one point it asks if this is to be installed for one user or all users, always pick “all users”.

Once the program is installed, open your QuickBooks file using this computer, then run the CCRSoftware program.

I am assuming that you are using this with a QuickBooks file that has already been accessed by the program.

You will be asked to select a “common” location.


You must choose the location where you placed the CCRQ.XML and *.repx files. If you moved them (single user installation) then locate the new folder where you placed them. If they had already been stored on a shared folder in a file server, locate that folder.

After this you will be asked to register the program. Keep in mind that you are limited to five installations per license.


Enter your name and serial number here. DO NOT click the “I already have a license” link, that is for a different issue, and you won’t get anywhere with that (other than becoming frustrated).

Note that if you pick the wrong location for the common folder, the program may ask you for your preference settings. If this occurs it is a sure sign that you have not picked the correct location for the CCRQ.XML file, or that you are using a different QuickBooks company file than before.

That is it! You should be all set.

What If You Goofed?

Sometimes people install the program without first moving the CCRQ.XML file to the new location. You’ll be able to tell that this happened when the program either asks you for your preference settings again, or it cannot find any customized forms or templates. One point of confusion for people in this situation is that the CCRSoftware product will create a new CCRQ.XML file for you in the location you have selected.

If this is the case, exit the CCRSoftware program, then determine where the old CCRQ.XML file is located. Move that and any repx files to the proper place. If you move it to the newly selected location (overwriting the newly created CCRQ.XML file) then you don’t have to change anything. If, on the other hand, you just selected the wrong “common location”, you can change that by running the program, selecting Help and then Tech Support, and then Reset Common Location. This allows you to select the proper place. You want to exit the CCRSoftware program and restart it.

Cannot open this QuickBooks Company (multiple instances)

This can be one of the more frustrating errors, “Cannot open this QuickBooks Company”. Why not? If you look at the details of the error message one of the common issues you will see is the following:

The application trying to connect to QuickBooks is not supported while multiple instances of QuickBooks are running. (80040438)

There are a couple of situations where you may see this.

Two Copies of QuickBooks

The first one is a bit obvious – you’ll see this message when you run the second copy:


This implies that there aren’t many problems (“a few exceptions”) on the first copy, and more on the second copy. Unfortunately, if you look at the Learn more information, you’ll see that add-on products like those from CCRSoftware (“SDK Applications”) cannot work with either of these QuickBooks windows.

If you check that “Do not display…” box then you don’t see this reminder again, and people can easily forget about these restrictions. You can bring the warning back by selecting Edit and then Preferences, then checking the box “Bring back all one time messages” in the My Preferences tab of the General preferences.

The short answer is – you can’t run CCRSoftware programs if you are running two copies of the same version of QuickBooks at the same time on the same computer.

Keep QuickBooks Running

Another issue is a bit more subtle. There is an option in QuickBooks that was added a few years ago that lets you keep a portion of the QuickBooks program running in the background when you exit the program. The reason for this was that it could make QuickBooks start up faster the next time that you run the program. Note that if your QuickBooks program is starting off slowly the most common fix is to make sure that you close all QuickBooks reports when you exit, as they can really slow down the startup process if QuickBooks has to open them all in the beginning.

Most people don’t see a big benefit to having this feature enabled, and by shutting it off you also may improve the performance of your computer when not running QuickBooks.

We find that many add-on connection problems are resolved by turning this feature off. To do so, select Edit and then Preferences in QuickBooks. Select the General preferences, and on the My Preferences tab un-check the box Keep QuickBooks running for quick startups.


Please note that in 2017 Intuit started removing this preference from supported versions of QuickBooks, so you might not see the preference.

After un-checking it, click OK to close the window, close QuickBooks, and reboot your computer. Note that this preference is specific to each user account, so every user of the system needs to un-check this.

Please note that often when you upgrade QuickBooks from one year of product to another the program may re-check this preference. We often get calls about this from people who have been using our product for years without problems, then run into the error just after upgrading QuickBooks.

CCRQInvoice and QuickBooks Permissions

If you use user accounts in QuickBooks and limit user permissions (and you should!), you need to provide users of CCRQInvoice with a basic set of permissions. It can be a bit confusing, because of the odd way that Intuit has configured things in QuickBooks. Here’s the basic permissions that you need to be able to use CCRQInvoice.

The Error You Might See…

If you have CCRQInvoice working with QuickBooks as the admin user, but you then open QuickBooks with a different user account that doesn’t have the proper permissions, you’ll usually get a 3260 error code.

There are several possible errors that can be displayed, but the common thread is the “3260” code at the end. That indicates a QuickBooks user permission error. The user running CCRQInvoice doesn’t have the correct data access permissions necessary to work with the transaction.

QuickBooks Pro and Premier Permissions

This is pretty easy. All you usually need to be able to run CCRQInvoice with QuickBooks Pro and QuickBooks Premier is to set Sales and Accounts Receivable Create permissions to Yes, and set Changing or Deleting Transactions to Yes.


With some older versions of QuickBooks you may also need Create Transactions permissions for Inventory. This might also be the case in some non-US versions of QuickBooks.

QuickBooks Enterprise Permissions

QuickBooks Enterprise is more complicated, and somewhat confusing. In Enterprise you have users and you have roles. You create the permissions in the roles and then assign the role to the user.

In addition, Intuit has a tendency to tinker with permission settings every once in awhile, so there may be some variations in how this works in different versions/releases.

There are two areas that you have to work with, Customers & Receivables and Lists. The permissions that I’ll lay out here should provide you with access to all features of CCRQInvoice (as of the version currently in production at the time this is being written), including sorting. You might be able to get by with fewer permissions if you don’t sort, although that isn’t certain.

In Customers & Receivables you need to provide View, Create and Modify permissions for Estimates, Sales Orders and Invoices (assuming you will work with each).

For Lists we have a number of permissions to set:

  • Item List needs to be set to View List.
  • Fixed Asset Item List needs to be set to View List. This isn’t intuitive – but internally, the Fixed Asset Items are actually a part of the overall Item List, so when CCRQInvoice asks for a list of all items, it has to be able to see the Fixed Asset Items as well. This catches a lot of people.
  • Terms List, which is a part of the Customer & Vendor Profile Lists, needs to be set to View List. This is a hard one to figure out – there isn’t any logical reason for this, but without it you can’t use the program.

Note that there isn’t a Customer List permission in the QuickBooks preferences – I think that may be why we have to have the Terms List there, something is slopping over to cover the customer list. But that is speculation.

In some cases you may need to give the user access to “sales tax” as well.

If you set your user permissions to be at least what I’ve listed above, your user accounts should be able to access CCRQInvoice without difficulty.

Error "Cannot update, can’t find the record"

With CCRQInvoice you may see an error in the “processing results” window as follows:

Cannot update, can’t find the record, possibly deleted by another user? (3120)

There are two reasons why you would see this.

First, the obvious. You “loaded” an invoice into CCRQInvoice, and then before you could click the “process” button, another user deleted the order. Yes, that can happen, but we’ll admit that the odds are against that.

Second, the less obvious. You are doing some sort of processing that saves a value in a custom field (such as “total weight” or “total quantity”). You specified a custom field in the CCRQInvoice preferences to hold the value. Then, at some later point, somebody changed the name of the custom field (or deleted it) in QuickBooks, without updating the preferences in CCRQInvoice. When CCRQInvoice processes the order, it tries to add the total value in the custom field that you specified, but it doesn’t exist in QuickBooks and an error occurs. Unfortunately, the error from QuickBooks is misinterpreted, and this misleading error is displayed.

The simple fix is to determine what the name of the custom field is in QuickBooks, and then updating the preference setting in CCRQInvoice to match.