“Data Extension Add” Error

If you are using CCRQInvoice you may see a Data Extension Add error when you are trying to process a QuickBooks order. This occurs if you are using QuickBooks Enterprise and are using a process that is updating a custom field in your order, such as “Total Quantity”. The error comes from using a format for the custom field, which causes difficulties.

The error message will point out the name of the custom field that is causing the problem.

When you create a custom field in QuickBooks Enterprise you can select from a list of options in the “What kind of data?” column. Due to the way that CCRQInvoice works with custom fields you must always choose “Any text” for this value.

This may seem counter-intuitive, aren’t you usually saving some numeric data in the field, like the total quantity? Unfortunately, QuickBooks requires the data to fit the EXACT format you have chosen. If you specify (for example) “Numbers, 2 decimals”, and you have an order where CCRQInvoice calculates a value like 3.234, QuickBooks will reject the value and generate an error.  The value has three decimals, not 2. Neither QuickBooks or CCRQInvoice will perform any sort of rounding or precision formatting.

Intuit doesn’t let us see the “What kind of data” value easily, so we don’t know if there is a format requirement. And, if the data is saved in a different format, the entire transaction is rejected.

The solution is to change the value to “Any text” for all of your custom fields used by CCRQInvoice to store a value.

Invalid Serial Number

Sometimes a user will have difficulty when trying to register a CCRSoftware product. There are a number of different error messages or situations that you may run into. Let’s show you what might be going on.

Different Registration Systems

To start with, there are two different registration systems that are used to register CCRSoftware products, depending on what version of the program you are installing. The serial number for one system won’t work with the other system. Sometimes a user may install a version that doesn’t match the serial number that they have.

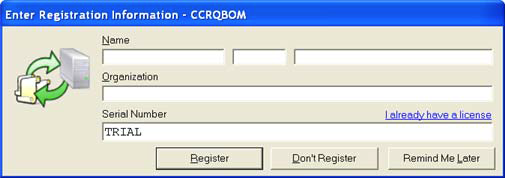
For CCRQInvoice versions 3.0.0.1 to 3.5.5 and CCRQBOM versions 3.0.4 to 3.6.0 the serial number will have the format “XXXXX-XXXXX-XXXXX-XXXXX”, 4 groups of 5 letters/numbers. For these versions you will see this kind of registration screen:

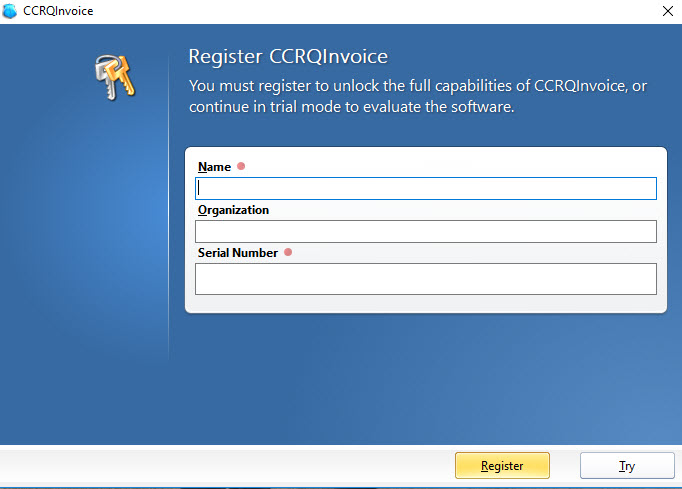
For CCRQInvoice versions 3.6.0 to 3.7.0 and CCRQBOM version 4.0.0 the serial number will have the format “STD-XXXXX-XXXXX-XXXX-XXXX”, the letters “STD” followed by 2 groups of 5 letters/numbers, then 2 groups of 4 letters/numbers. For these versions you will see this kind of registration screen:

If you try to use a serial number that doesn’t match the version, you will either get a message along the line of “The serial number provided is invalid”, or you just won’t be able to enter the serial number.

TO RESOLVE THIS you want to download the proper version. Note that if you had a DIFFERENT version than what is listed below, you should contact our support department for compatibility (or upgrade) information.

I Already Have A License

This throws a lot of people off. Our documentation talks about this, briefly, but who reads documentation any more?

If you have a registration screen like this, and you are reinstalling the software, some people decide that they need to click the “I already have a license” link.


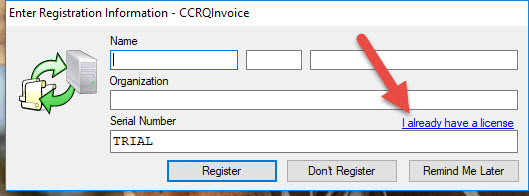
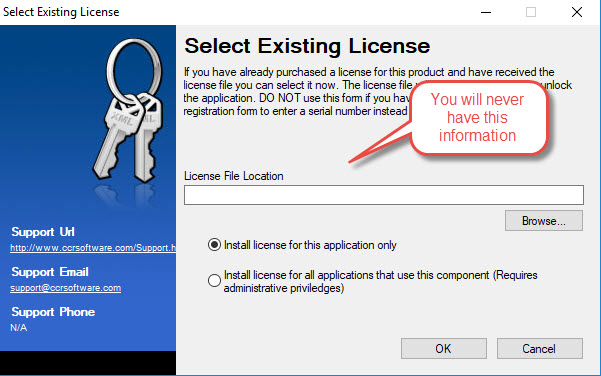
Please don’t – that link is misleading, it won’t do what you want. It will ask you for a license file (*.lic), and you won’t have one.

That link is used for a special situation when recovering a license on an existing computer, which won’t be your case (in fact, we’ve never had a user that needed to do this). Just go ahead and enter your name and the serial number in the regular field. If you don’t know your serial number, contact support.

The Serial Number Provided is Invalid

With the standard/public releases, when you enter the serial number, you may see this error:

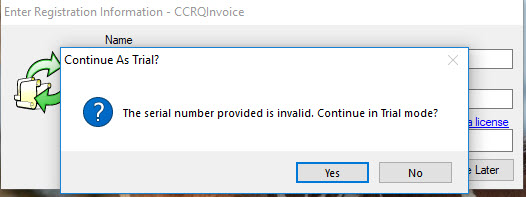
There are a couple of reasons why you might see this.

Perhaps you have a typo in the serial number? 1968P-XXXXX-XXXXX-X04W3 is not the same as l968P-XXXXX-XXXXX-XO4W3. The numbers 1 and 0 are not the same as the letters l and O.

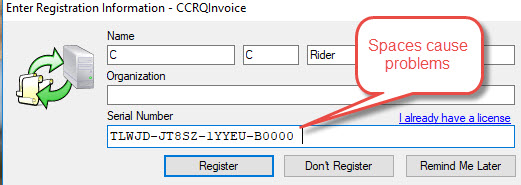
A common error is that you copy/paste the serial number from a document, or the original email you received, but you add a space to the end. “1968P-XXXXX-XXXXX-X04W3  ” is not the same as “1968P-XXXXX-XXXXX-X04W3” for example – there is an added space at the end of the first one, and the program doesn’t like that. Very common error.

Wrong Software Product

Last but not least, sometimes we have people who try to use a CCRQInvoice serial number with CCRQBOM, or vice-versa. Won’t work!


CCRQInvoice Won’t Process Orders

If you are using CCRQInvoice and you can’t get the program to process orders for you, here’s a checklist to go through to help resolve the problem.

This assumes that you have connected the program to your QuickBooks company file and that you aren’t getting any error messages. If you are getting an error message then you can search this website for information on the particular error. If you can’t find your error, send us diagnostic information.

 Open QuickBooks Company File Menu

If you just get this window, then one of several things have occurred:


  • Your QuickBooks company file isn’t open yet. Open it before you run CCRQInvoice.
  • You haven’t told QuickBooks that it is OK to access this file. This must be done by the QuickBooks admin user. See the installation documentation for details on setting things up.
  • There was some kind of error message preceding this. Look for a description of the error message or send us diagnostic information.

All Menu Options are Gray

If you open CCRQInvoice and all options are grayed out, this means you aren’t connected to the QuickBooks company file. The remedies are the same as listed in the Open QuickBooks Company File Menu section above.

Processing Options are Grayed Out

If you open the Order Processing window and you cannot select the option you want because it is grayed out, that means that you haven’t set up preferences for this company file. Note that this also can happen if you change your Company Name in the QuickBooks My Company information section.


To correct this, select Preferences in CCRQInvoice, then click the button by Parameter Wizard.

When you get to the Processing Options screen, choose the option you wish to enable.

Your Orders Aren’t Sorting or Totaling

OK, so everything seems to work so far, but nothing happens! You can open CCRQInvoice without an error, your preferences are all set, but nothing happens?

First of all, remember that if you set up totals, the totaling won’t happen automatically. You have to run the Order Processing function, load your orders, select your options and then click one of the Process buttons. This is described in the documentation. New users sometimes expect it all to happen automatically, but Intuit won’t let us work that way.

If that still doesn’t work, the most common issue is that you have multiple conflicting options. If you have enabled multiple processing options and several of them are sharing the same custom fields, they may interfere with each other. Make sure you don’t have different options using the same custom fields.

Another possibility is that you are trying to process an order that is open in QuickBooks. Don’t have the order open in QuickBooks when processing it, since QuickBooks has placed a lock on the order to prevent our program from updating it at the same time.

Beyond that, there are a number of potential (but not common) problems that can cause an issue. Again, we are assuming that you are not getting any error messages, then you can send us some diagnostic information. At this point we need a log file where you process a single invoice. Don’t process multiple invoices, that makes it too hard to identify the problem. The procedure for setting up a log file and sending it to us is outlined in this article about how to send us diagnostic information.

CCRQInvoice and QuickBooks Permissions

If you use user accounts in QuickBooks and limit user permissions (and you should!), you need to provide users of CCRQInvoice with a basic set of permissions. It can be a bit confusing, because of the odd way that Intuit has configured things in QuickBooks. Here’s the basic permissions that you need to be able to use CCRQInvoice.

The Error You Might See…

If you have CCRQInvoice working with QuickBooks as the admin user, but you then open QuickBooks with a different user account that doesn’t have the proper permissions, you’ll usually get a 3260 error code.

There are several possible errors that can be displayed, but the common thread is the “3260” code at the end. That indicates a QuickBooks user permission error. The user running CCRQInvoice doesn’t have the correct data access permissions necessary to work with the transaction.

QuickBooks Pro and Premier Permissions

This is pretty easy. All you usually need to be able to run CCRQInvoice with QuickBooks Pro and QuickBooks Premier is to set Sales and Accounts Receivable Create permissions to Yes, and set Changing or Deleting Transactions to Yes.


With some older versions of QuickBooks you may also need Create Transactions permissions for Inventory. This might also be the case in some non-US versions of QuickBooks.

QuickBooks Enterprise Permissions

QuickBooks Enterprise is more complicated, and somewhat confusing. In Enterprise you have users and you have roles. You create the permissions in the roles and then assign the role to the user.

In addition, Intuit has a tendency to tinker with permission settings every once in awhile, so there may be some variations in how this works in different versions/releases.

There are two areas that you have to work with, Customers & Receivables and Lists. The permissions that I’ll lay out here should provide you with access to all features of CCRQInvoice (as of the version currently in production at the time this is being written), including sorting. You might be able to get by with fewer permissions if you don’t sort, although that isn’t certain.

In Customers & Receivables you need to provide View, Create and Modify permissions for Estimates, Sales Orders and Invoices (assuming you will work with each).

For Lists we have a number of permissions to set:

  • Item List needs to be set to View List.
  • Fixed Asset Item List needs to be set to View List. This isn’t intuitive – but internally, the Fixed Asset Items are actually a part of the overall Item List, so when CCRQInvoice asks for a list of all items, it has to be able to see the Fixed Asset Items as well. This catches a lot of people.
  • Terms List, which is a part of the Customer & Vendor Profile Lists, needs to be set to View List. This is a hard one to figure out – there isn’t any logical reason for this, but without it you can’t use the program.

Note that there isn’t a Customer List permission in the QuickBooks preferences – I think that may be why we have to have the Terms List there, something is slopping over to cover the customer list. But that is speculation.

In some cases you may need to give the user access to “sales tax” as well.

If you set your user permissions to be at least what I’ve listed above, your user accounts should be able to access CCRQInvoice without difficulty.

Error "Cannot update, can’t find the record"

With CCRQInvoice you may see an error in the “processing results” window as follows:

Cannot update, can’t find the record, possibly deleted by another user? (3120)

There are two reasons why you would see this.

First, the obvious. You “loaded” an invoice into CCRQInvoice, and then before you could click the “process” button, another user deleted the order. Yes, that can happen, but we’ll admit that the odds are against that.

Second, the less obvious. You are doing some sort of processing that saves a value in a custom field (such as “total weight” or “total quantity”). You specified a custom field in the CCRQInvoice preferences to hold the value. Then, at some later point, somebody changed the name of the custom field (or deleted it) in QuickBooks, without updating the preferences in CCRQInvoice. When CCRQInvoice processes the order, it tries to add the total value in the custom field that you specified, but it doesn’t exist in QuickBooks and an error occurs. Unfortunately, the error from QuickBooks is misinterpreted, and this misleading error is displayed.

The simple fix is to determine what the name of the custom field is in QuickBooks, and then updating the preference setting in CCRQInvoice to match.

Adding Line Numbers to Order Forms

In CCRQInvoice open the report designer. I’ve inserted a new column in the DetailInner section for the line counter, and in the GroupHeaderInvoiceTop section for the column heading. I’ve added a Cross-band box and adjusted the boxes as is appropriate.

Click once on the new column that you have added and then click on the small “pip” that appears in the upper right corner.


Click on the ellipsis (…) next to Summary to open the Summary Editor. In the Summary function line, select RecordNumber, which will be near the bottom of the list. For Summary Running select the Group option (note that the Bound field selection will be blank).


Save the modified report and give it a name. Here is a sample of what it should look like:


Alternating Color Bands for Forms

One element that can make a printed invoice easier to read is to print every other detail line with a different background color or shade, so that it is easy to distinguish between the detail lines. This feature can be added very easily to CCRQInvoice form templates, as we will show you in this article.

Edit the Template

Run CCRQInvoice, select Forms, then Edit Order Forms. You will see the Edit Forms window. Note that you probably won’t see all of the forms that I show here – if this is your first time editing forms in CCRQInvoice you will only see the “Standard” form listed.


Click once on the “Standard” form (or any other form that you might want to change) and click the Edit button to open the form editor.

Add a Color Style

The CCRQInvoice form editor allows you to create a “style” object that defines a number of characteristics, such as background color and font. We will create a “style” that has a different background color, and set it up to be used on alternating detail lines in the detail band of the form.

Click once on the DetailInner band to select it, and look in the Property Grid window (usually at the lower right side of the screen. Find the Styles property, and click on the ellipsis (…) on the right.


This opens the Style Editor window. Click the green plus sign in the upper left to add a style, change the name property for the style to something that makes sense to you, and find the background color property.


The dropdown list for colors lets you pick the color in several different ways. I usually use the “Web” tab, which shows a number of colors by name. You can use any option that you wish. For this example, I picked “BurlyWood” from the web tab. The Styles Editor will show you a sample.

Close the Style Editor

Applying the Style

Now we need to apply the style to the DetailInner band. The Styles property has several components – if you click the plus (+) by Styles you will see that there are several options; Odd, Even and Style. Since we want every other detail line to have the background color, select Even and pick your newly created style from the dropdown list.


That’s all you have to do! Save your edited form (File then Save As) and exit the editor. Your new form will appear on the for list. Close the Edit Reports window.

Viewing the Results

Select Order Processing, load some orders, click the Printing tab, and select your new form from the Form dropdown list.


As you can see, our printed form now has a colored background for every other detail line in the form.


Note that this Style can be used for any object in the form. So you can use the same background color in other elements if you wish to set a theme for the form. You could use it to highlight the data, invoice number and addresses, if you wish.

One shortcoming to this is that the color bars will only print in the DetailInner band where you have a detail line printing. If you don’t have enough details to fill the page, the color bands will not show up in the empty section of the band.

Adding Your Logo to CCRQInvoice Forms

You can print your invoices, sales orders and estimates with CCRQInvoice . We provide a form editor that lets you design your own form. Here is a quick article on how to add your company logo to a custom invoice form.

  1. Select Forms from the main menu in CCRQInvoice, then Edit Order Forms.
  2. Highlight the form you want to work with – if you haven’t created your own form yet, the only option will be “Standard”. Click the Edit button to open the form editor.

  3. In the upper left corner of the standard form there is a “CompanyName” and “CompanyAddress” block. These are the company information from your QuickBooks company file. If your logo contains your address information, you may want to delete these. Otherwise, you will need to click on them and move/resized them to make room for your logo. In this example, I’ll remove the “CompanyName” (click on it, press the “delete” key) and rearrange the “CompanyAddress”.

  4. Add a picture box control by clicking on the control in the tool box and dragging it to the form. Resize it to be the size you would like.

  5. Right click on the picture box and select Properties. A property grid box should open on the screen, usually on the right side. Change the following properties:
    1. Borders to “none”.
    2. Click on the Image URL option to get an ellipsis (…), click on that to open a file dialog. Locate a graphic file that contains your logo. This must be one of the typical Windows graphic files, such as a JPG, GIF, BMP or so forth.  When you locate a logo, it will display in the control, but it might not look right.
    3. Change the Sizing property to “Zoom Image” (there is a dropdown list of options)
    4. Resize the picture box to size the logo appropriately.
    5. Save the modified form – either with File/Save As (if you started with the “standard” form) or File/Save. Close the editor window

In the print preview we see that the logo has been added.


Your logo should appear on the form.

Adding Contract Pages to Invoices

QuickBooks has a page oriented form editor that you use to create your “templates” for invoices, sales orders and estimates. This approach places some limits on how you can design your form. This article talks about how you can use CCRQInvoice to add a contract page to the end of your order form.

A page oriented form editor lets you design the layout of the entire page. It is an easy to use method, you can see exactly what the form will look like. However, every page you print will have that same layout. There are two significant drawbacks to this in QuickBooks forms:

  • You cannot add a contract page to the end of the form. A disclaimer, terms of service or a contract, which you would like to have appended to the end of each order. If you try this with QuickBooks you can only have this information print on every page, and this takes up room from your order detail lines.
  • You cannot have a total section that only prints on the last page of a multiple page invoice. With QuickBooks the footer of each page will show the labels and boxes you set up for the totals, even though a value only shows on the last page.

CCRQInvoice can be used to print invoices, sales orders or estimates (which I collectively refer to as “orders” here) from your QuickBooks company file. It includes a more complicated form editor that is report oriented rather than page oriented. This includes the ability to format your form templates so that totals only print on the last page of a multiple page order, and to add contract pages to the end of the order. The drawback is – the CCRQInvoice form designer is more complicated to use than the simple page oriented form designer in QuickBooks.

As a side note – if you don’t want to take the time to learn how to use the CCRQInvoice form designer we can create a modified template for you for a very reasonable fee.

Sample Forms using CCRQInvoice

I have created four sample forms to use with CCRQInvoice to illustrate how to add contract pages (note that they also print totals only on the last page). Download the Contract Forms, which are in a zip file. Unzip them to any folder on your computer (your Desktop or My Documents folders are easy to use). Run CCRQInvoice, select the Forms menu, and the Edit Order Forms option. Select the Import button, locate the forms (they have a file type of repx) and they will be imported to your form library.

There are four samples:

  • Contract Option A: This lets you prepare a full page contract, or any other text, that will print at the end of the order. The good points – you get a full page of text. The drawbacks – you can’t add any information (such as the order number) to that page, and you need to print them one at a time (not in a batch).
  • Contract Option A (2 page): A variation of the prior option that has more than one page of added text – a bit trickier to set up.
  • Contract Option B: Comparing this to Option A – the form header repeats on each page, so you have information such as the order number, date and so forth. You also can use this to print a batch of orders at one time. The disadvantage here is that you don’t get a full page of text.
  • Contract Option B (2 page): Same as Option B but with multiple pages of text.

Let’s take a look at a sample invoice. This invoice has two pages of detail items, followed by a contract form. Note that you can create the contract form as an “RTF” file with Microsoft Word and import it to the order template.

Note that you can click on any image to see a larger version.

Here are the three pages using Option A:

The first page of a three page invoice using Option A
The second page of a three page invoice using Option A, note the totals
The third page of a three page invoice using Option A, showing the contract

Now let’s look at the third page if you used Option B. This allows you to have some invoice (order) information on the page, but you have less control over appearance and less room.

The third page of a three page invoice using Option B, note the header

Setting up these forms can be a bit complex – it is easier to take our sample and modify it to your needs. Better yet, let us create a form for you! Entering and editing the contract text is simple, however.


Why Are My Totals Wrong? Punctuation…

If you are using one of the “total” features of CCRQInvoice, such as “total quantity” or “total weight”, you may find that the totals that are created may be incorrect. Why? Punctuation!

In CCRQInvoice 3.3.1.1 and earlier, if you have an apostrophe (and possibly some other punctuation characters such as quotes) in the description or in the item ID, the item may not be included in the total. In some cases you will get an error message, in others you will not.

How can you resolve this?

  1. You can remove the punctuation from your item ID and description.
  2. You can submit a support request through this support portal for an update to a “pre-release” version of the software that does not have this problem.

Note that the pre-release software has been tested thoroughly and is in use by many people – it hasn’t been released because the documentation hasn’t been updated yet and because a new feature (unrelated to order processing) hasn’t been completed.

Another cause of incorrect totals can be that your preferences are set to only include certain item types, so it is skipping some items. Typically the system is set up to count only non-inventory and inventory items – so if you have a service item that might not be included. So the first thing to check if you see totals not working is what item types your order includes, and what your CCRQInvoice preferences are set to count.