CCRSoftware Support

Adding Line Numbers to Order Forms

In CCRQInvoice open the report designer. I’ve inserted a new column in the DetailInner section for the line counter, and in the GroupHeaderInvoiceTop section for the column heading. I’ve added a Cross-band box and adjusted the boxes as is appropriate.

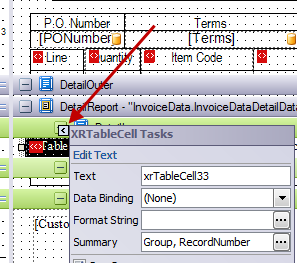
Click once on the new column that you have added and then click on the small “pip” that appears in the upper right corner.


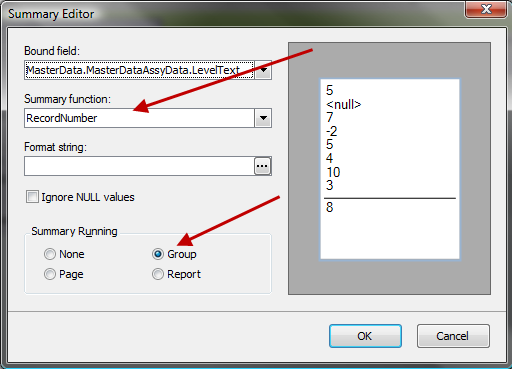
Click on the ellipsis (…) next to Summary to open the Summary Editor. In the Summary function line, select RecordNumber, which will be near the bottom of the list. For Summary Running select the Group option (note that the Bound field selection will be blank).


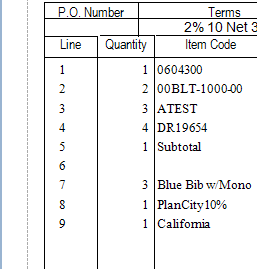
Save the modified report and give it a name. Here is a sample of what it should look like:


Alternating Color Bands for Forms

One element that can make a printed invoice easier to read is to print every other detail line with a different background color or shade, so that it is easy to distinguish between the detail lines. This feature can be added very easily to CCRQInvoice form templates, as we will show you in this article.

Edit the Template

Run CCRQInvoice, select Forms, then Edit Order Forms. You will see the Edit Forms window. Note that you probably won’t see all of the forms that I show here – if this is your first time editing forms in CCRQInvoice you will only see the “Standard” form listed.


Click once on the “Standard” form (or any other form that you might want to change) and click the Edit button to open the form editor.

Add a Color Style

The CCRQInvoice form editor allows you to create a “style” object that defines a number of characteristics, such as background color and font. We will create a “style” that has a different background color, and set it up to be used on alternating detail lines in the detail band of the form.

Click once on the DetailInner band to select it, and look in the Property Grid window (usually at the lower right side of the screen. Find the Styles property, and click on the ellipsis (…) on the right.


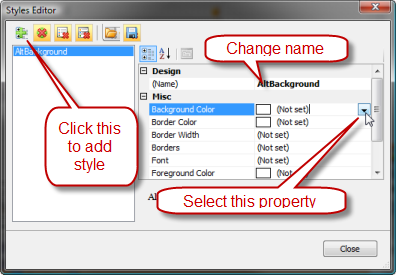
This opens the Style Editor window. Click the green plus sign in the upper left to add a style, change the name property for the style to something that makes sense to you, and find the background color property.


The dropdown list for colors lets you pick the color in several different ways. I usually use the “Web” tab, which shows a number of colors by name. You can use any option that you wish. For this example, I picked “BurlyWood” from the web tab. The Styles Editor will show you a sample.

Close the Style Editor

Applying the Style

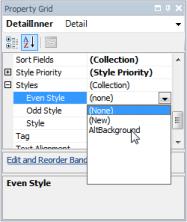
Now we need to apply the style to the DetailInner band. The Styles property has several components – if you click the plus (+) by Styles you will see that there are several options; Odd, Even and Style. Since we want every other detail line to have the background color, select Even and pick your newly created style from the dropdown list.


That’s all you have to do! Save your edited form (File then Save As) and exit the editor. Your new form will appear on the for list. Close the Edit Reports window.

Viewing the Results

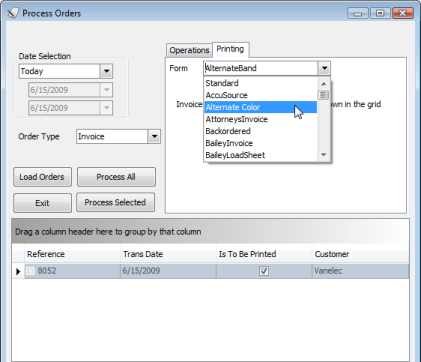
Select Order Processing, load some orders, click the Printing tab, and select your new form from the Form dropdown list.


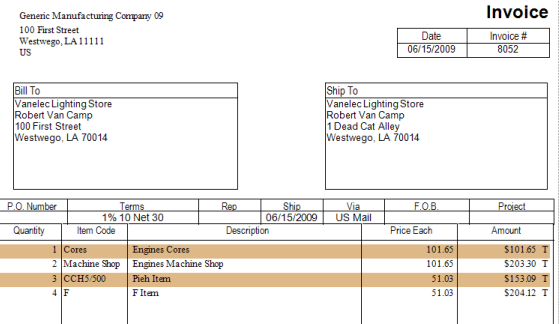
As you can see, our printed form now has a colored background for every other detail line in the form.


Note that this Style can be used for any object in the form. So you can use the same background color in other elements if you wish to set a theme for the form. You could use it to highlight the data, invoice number and addresses, if you wish.

One shortcoming to this is that the color bars will only print in the DetailInner band where you have a detail line printing. If you don’t have enough details to fill the page, the color bands will not show up in the empty section of the band.

Adding Your Logo to CCRQInvoice Forms

You can print your invoices, sales orders and estimates with CCRQInvoice . We provide a form editor that lets you design your own form. Here is a quick article on how to add your company logo to a custom invoice form.

  1. Select Forms from the main menu in CCRQInvoice, then Edit Order Forms.
  2. Highlight the form you want to work with – if you haven’t created your own form yet, the only option will be “Standard”. Click the Edit button to open the form editor.

  3. In the upper left corner of the standard form there is a “CompanyName” and “CompanyAddress” block. These are the company information from your QuickBooks company file. If your logo contains your address information, you may want to delete these. Otherwise, you will need to click on them and move/resized them to make room for your logo. In this example, I’ll remove the “CompanyName” (click on it, press the “delete” key) and rearrange the “CompanyAddress”.

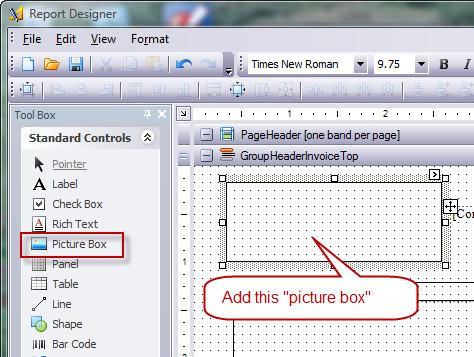
  4. Add a picture box control by clicking on the control in the tool box and dragging it to the form. Resize it to be the size you would like.

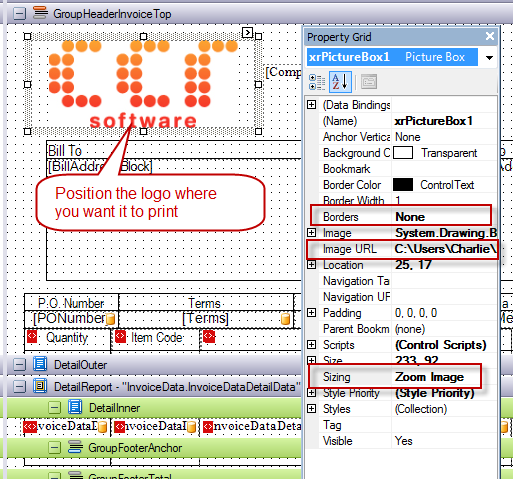
  5. Right click on the picture box and select Properties. A property grid box should open on the screen, usually on the right side. Change the following properties:
    1. Borders to “none”.
    2. Click on the Image URL option to get an ellipsis (…), click on that to open a file dialog. Locate a graphic file that contains your logo. This must be one of the typical Windows graphic files, such as a JPG, GIF, BMP or so forth.  When you locate a logo, it will display in the control, but it might not look right.
    3. Change the Sizing property to “Zoom Image” (there is a dropdown list of options)
    4. Resize the picture box to size the logo appropriately.
    5. Save the modified form – either with File/Save As (if you started with the “standard” form) or File/Save. Close the editor window

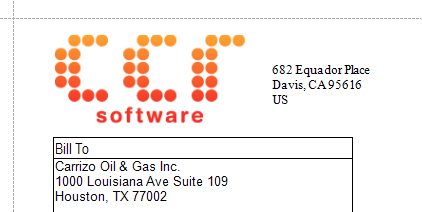
In the print preview we see that the logo has been added.


Your logo should appear on the form.

Adding Contract Pages to Invoices

QuickBooks has a page oriented form editor that you use to create your “templates” for invoices, sales orders and estimates. This approach places some limits on how you can design your form. This article talks about how you can use CCRQInvoice to add a contract page to the end of your order form.

A page oriented form editor lets you design the layout of the entire page. It is an easy to use method, you can see exactly what the form will look like. However, every page you print will have that same layout. There are two significant drawbacks to this in QuickBooks forms:

  • You cannot add a contract page to the end of the form. A disclaimer, terms of service or a contract, which you would like to have appended to the end of each order. If you try this with QuickBooks you can only have this information print on every page, and this takes up room from your order detail lines.
  • You cannot have a total section that only prints on the last page of a multiple page invoice. With QuickBooks the footer of each page will show the labels and boxes you set up for the totals, even though a value only shows on the last page.

CCRQInvoice can be used to print invoices, sales orders or estimates (which I collectively refer to as “orders” here) from your QuickBooks company file. It includes a more complicated form editor that is report oriented rather than page oriented. This includes the ability to format your form templates so that totals only print on the last page of a multiple page order, and to add contract pages to the end of the order. The drawback is – the CCRQInvoice form designer is more complicated to use than the simple page oriented form designer in QuickBooks.

As a side note – if you don’t want to take the time to learn how to use the CCRQInvoice form designer we can create a modified template for you for a very reasonable fee.

Sample Forms using CCRQInvoice

I have created four sample forms to use with CCRQInvoice to illustrate how to add contract pages (note that they also print totals only on the last page). Download the Contract Forms, which are in a zip file. Unzip them to any folder on your computer (your Desktop or My Documents folders are easy to use). Run CCRQInvoice, select the Forms menu, and the Edit Order Forms option. Select the Import button, locate the forms (they have a file type of repx) and they will be imported to your form library.

There are four samples:

  • Contract Option A: This lets you prepare a full page contract, or any other text, that will print at the end of the order. The good points – you get a full page of text. The drawbacks – you can’t add any information (such as the order number) to that page, and you need to print them one at a time (not in a batch).
  • Contract Option A (2 page): A variation of the prior option that has more than one page of added text – a bit trickier to set up.
  • Contract Option B: Comparing this to Option A – the form header repeats on each page, so you have information such as the order number, date and so forth. You also can use this to print a batch of orders at one time. The disadvantage here is that you don’t get a full page of text.
  • Contract Option B (2 page): Same as Option B but with multiple pages of text.

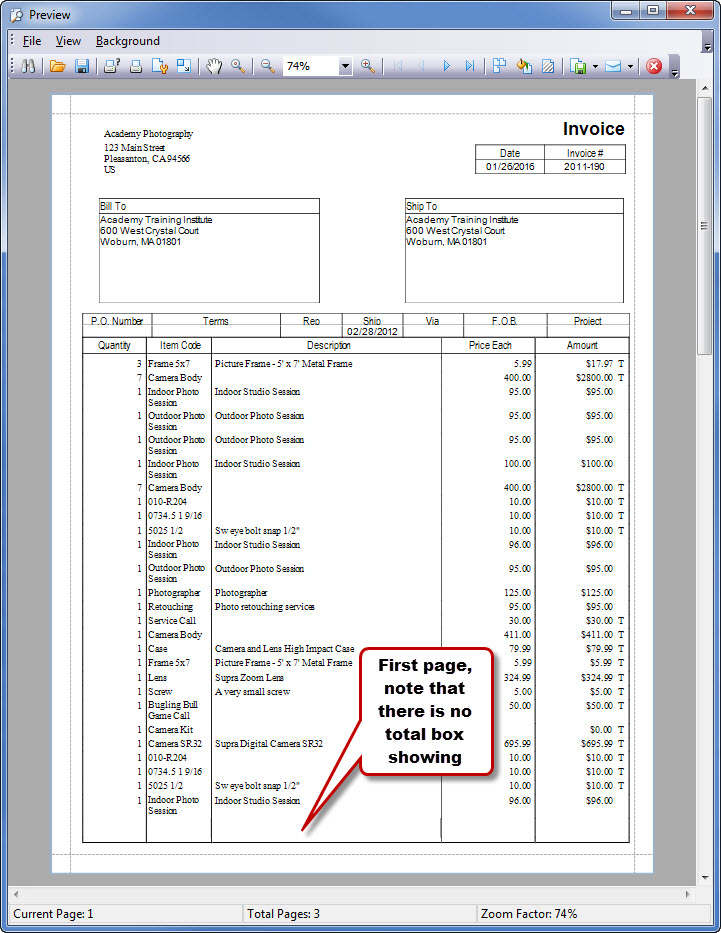
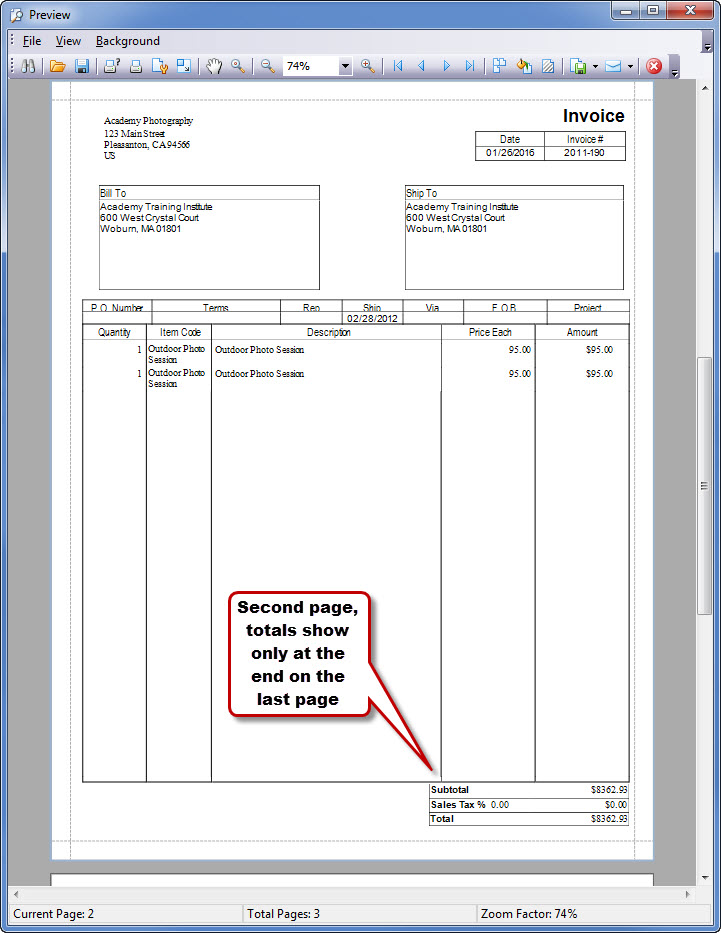
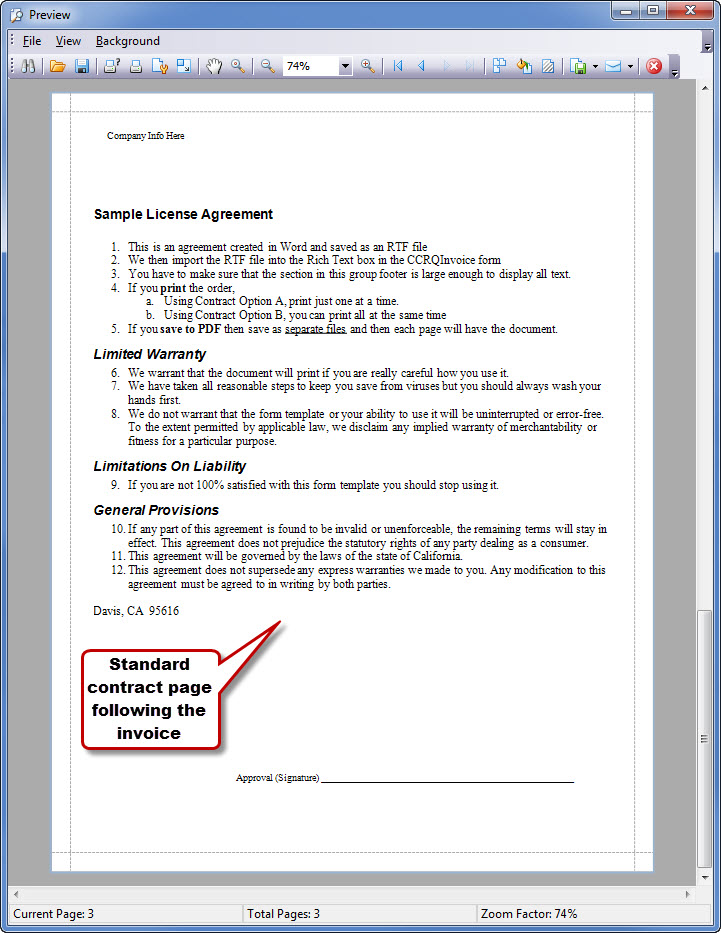
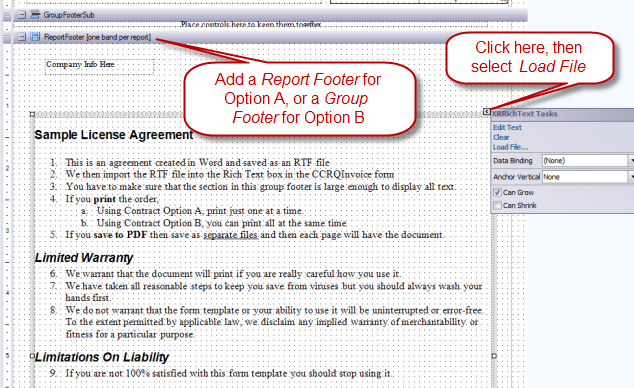
Let’s take a look at a sample invoice. This invoice has two pages of detail items, followed by a contract form. Note that you can create the contract form as an “RTF” file with Microsoft Word and import it to the order template.

Note that you can click on any image to see a larger version.

Here are the three pages using Option A:

The first page of a three page invoice using Option A
The second page of a three page invoice using Option A, note the totals
The third page of a three page invoice using Option A, showing the contract

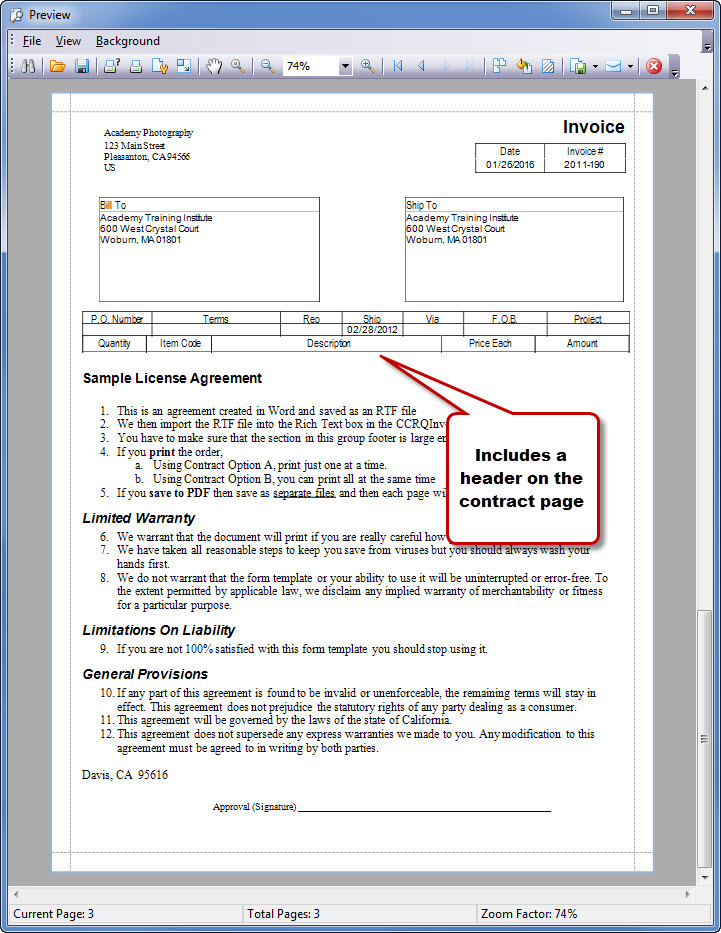
Now let’s look at the third page if you used Option B. This allows you to have some invoice (order) information on the page, but you have less control over appearance and less room.

The third page of a three page invoice using Option B, note the header

Setting up these forms can be a bit complex – it is easier to take our sample and modify it to your needs. Better yet, let us create a form for you! Entering and editing the contract text is simple, however.


Changing the Common Path

The first time that you install CCRQInvoice on a computer you will be asked to select a “Common Path” (sometimes referred to as a “Common Folder” or “Common Location”. CCRQInvoice will store your preference settings here, and any form templates that you modify.

Note, this applies to CCRQBOM as well

In a multi-user environment it is important that all users share the same location (hence the “common” name), so that all users can share the same preference settings AND share any form templates you create. Unfortunately, people often don’t choose the proper place when first installing the program.

This article will outline how to correct this problem.

Assuming that you have already installed the program and used it on a computer, run CCRQInvoice.

  1. Select Help in the main menu.
  2. Select Status.
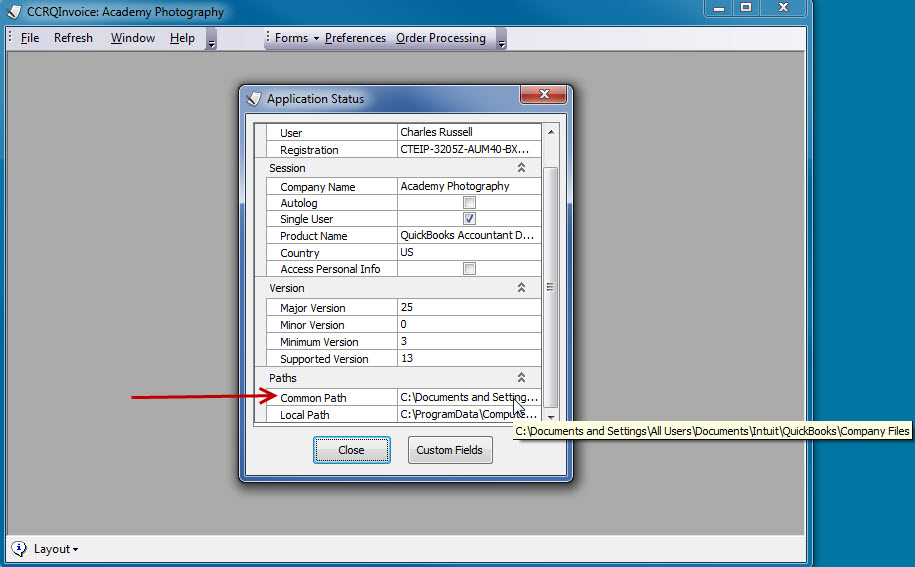
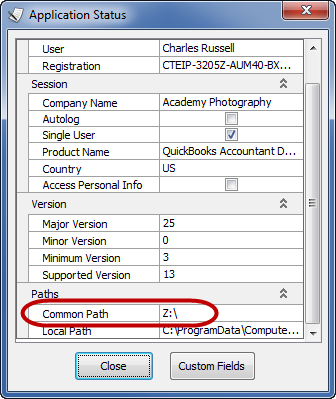
  3. Scroll to the bottom of the Application Status window and look for the “Common Path” setting. You can see the value by either changing the window width, or holding the mouse cursor over the value.


Take note of this value. This is where you will find several files, including:

  • CCRQ.XML (the preferences file)
  • Possibly multiple files with a file type of “repx” (report templates that you have created).

Decide on a location that you want to use as the “common” location, that all CCRQInvoice users will share. This should NOT be on a local computer in a multi user situation – it should be on a file server. A useful location may be where your QuickBooks company file is stored. It is important that all users have read/write/create permission at this location. If they don’t, they may get an error when running CCRQInvoice (see this article for example).

Copy the CCRQ.XML file and all of the “repx” files to this new location.

Now you need to reset each user workstation to use the new location. On each computer:

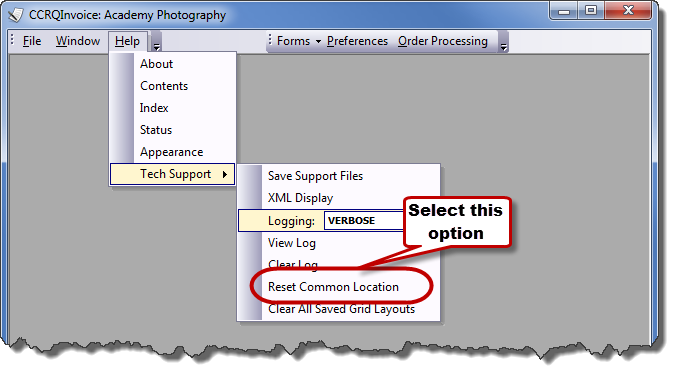
  1. Select Help from the main menu.
  2. Select Tech Support.
  3. Select Reset Common Location.
  4. You will see a warning asking if you are sure that you want to do this. Click OK.
  5. The normal Program Setup dialog will open, as shown in the program documentation. Click Next and then in the folder dialog select the new location that you want to use (where you have already copied the CCRQ.XML and repx files).
  6. Click Finish.
  7. Exit CCRQInvoice. This is important, as it is still looking at the old location.
  8. Perform these steps on all other workstations that you have installed.

The next time you run CCRQInvoice on this computer it will use the new location

Why Are My Totals Wrong? Punctuation…

If you are using one of the “total” features of CCRQInvoice, such as “total quantity” or “total weight”, you may find that the totals that are created may be incorrect. Why? Punctuation!

In CCRQInvoice 3.3.1.1 and earlier, if you have an apostrophe (and possibly some other punctuation characters such as quotes) in the description or in the item ID, the item may not be included in the total. In some cases you will get an error message, in others you will not.

How can you resolve this?

  1. You can remove the punctuation from your item ID and description.
  2. You can submit a support request through this support portal for an update to a “pre-release” version of the software that does not have this problem.

Note that the pre-release software has been tested thoroughly and is in use by many people – it hasn’t been released because the documentation hasn’t been updated yet and because a new feature (unrelated to order processing) hasn’t been completed.

Another cause of incorrect totals can be that your preferences are set to only include certain item types, so it is skipping some items. Typically the system is set up to count only non-inventory and inventory items – so if you have a service item that might not be included. So the first thing to check if you see totals not working is what item types your order includes, and what your CCRQInvoice preferences are set to count.

Why Doesn’t My Report Show All The Info?

When you are working with a CCRQBOM or CCRQInvoice report that has a large amount of information, sometimes you may find that the report doesn’t show all of the detail lines that you expect. This most often occurs when you have created your own report definition in the form editor. Why does this happen, and what can be done about it?

Most people print reports with the “print preview” option, and if you create your own report template there is a preference setting in the report that will limit the number of detail lines that show in the preview. This is the most common reason for a large report not showing all of your information – it is limited to “100 lines” in the preview.

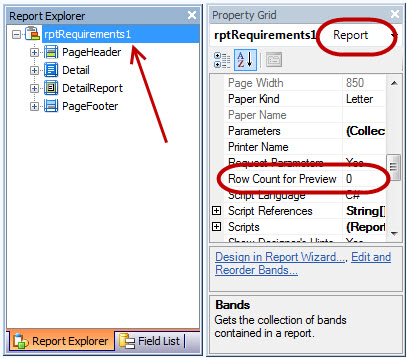
That is an easy issue to fix in your report definition. Edit the report, make sure that you have the “report” selected in the Report Explorer (not one of the subsections). Then in the Property Grid look for the Row Count for Preview property. If this is set to a number (typically 100), you want to change it to zero (which means unlimited), and then save the report. That should fix this problem.

Note that this also means that your print previews can take a long time to display if you have a large report.

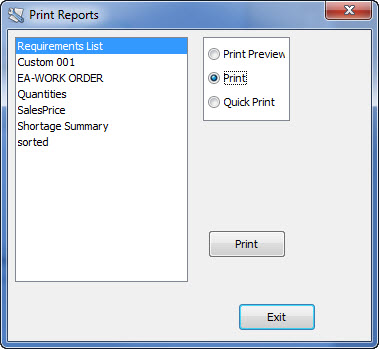
Alternately, instead of editing the report, use the Print option instead of Print Preview. This bypasses the limit, and prints the report directly to the printer that you choose.


How To Get The Total Cost of Shortages On A Requirements List

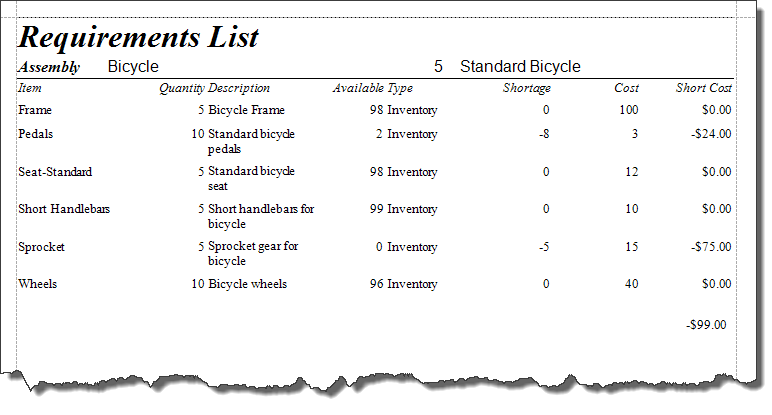
CCRQBOM can generate a requirements list, a report that shows what items you need to purchase if you want to build a required quantity of an assembly. I’ll show you how to add some calculated fields to the report to provide total shortage cost calculation.Here is a requirement list to build a quantity 5 of assembly Bicycle. You can see that there are shortages for two inventory parts.
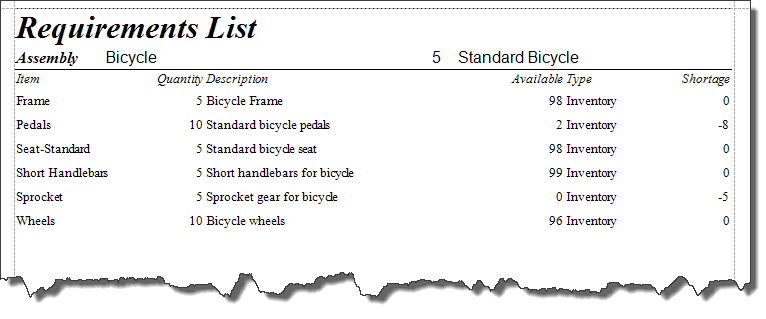
 

This uses the standard report template that comes with CCRQBOM.

To modify this template I will select the requirements template from the forms menu.
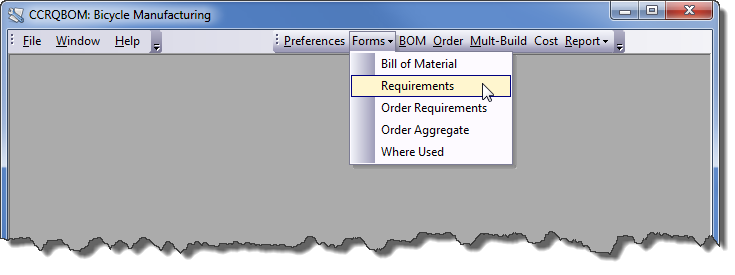
 

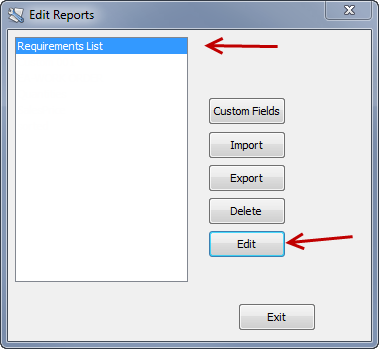
Select the requirements list option in the edit reports window and click the edit button.
 

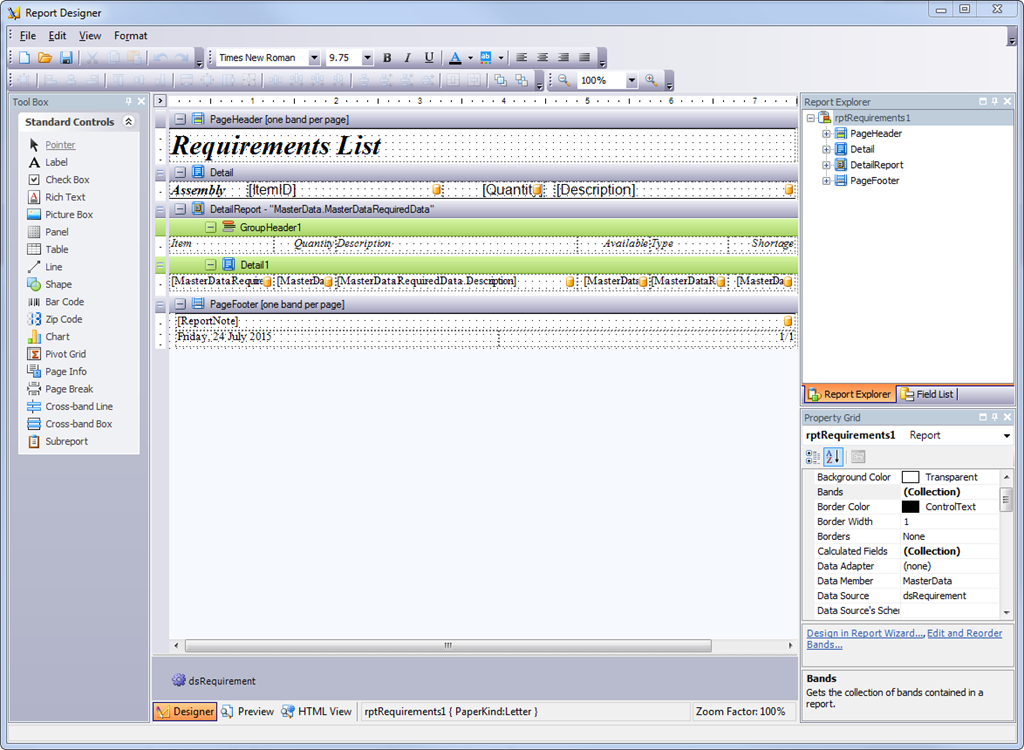
This opens (sometimes after a bit of a delay) the report designer window. Please note that this window may look a bit different with some versions of CCRQBOM, but the elements should all be the same.
 

Creating a Calculated Field

The first step is to add a calculated field to hold the item cost X shortage value.

In the field list find the MasterDataRequiredData section of MasterData.


Right click on this section to select Add Calculated Field. This adds a calculated field to the field list. In the property grid lower on the screen you should see the properties for this field.


Change the name of the field to ShortCost, then select expression and click the “…” symbol to open the Expression Editor.


In the expression editor select the fields section. Locate ItemCost and double click it to add it to the expression. Double click the “X” symbol to add the multiply operator. Then double click the Shortage field to add that. Click OK to save this expression.
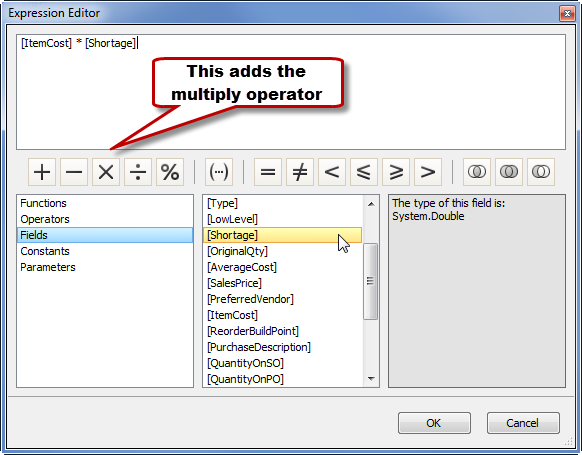
 

Note that in this case I’m using the ItemCost field, which is “Cost” in QuickBooks. You might want to use AverageCost instead.

Select this ShortCost field for the data binding for the last column, as we illustrated before with the ItemCost field.

Adding Columns

I’ll add two columns, one for ItemCost and one for the calculated shortage cost. I’m not going to make the report pretty, I’m just going to add the columns. You may want to rearrange things or delete unnecessary columns.

Right click on the rightmost column in the Detail1 section, select Insert, and then Column to right. Do this again to add a second column. Repeat this with the headers in GroupHeader1. Then resized the columns to fit what you want.


Double click on each heading column and enter the column names, “Cost” and “Short Cost”.

Change the column headings by double clicking on them and typing in the text you want.

Find ItemCost in the Field List, drag it and drop it on the cell for that column in Detail1. Do the same with ShortCost for the last column.

Select each of the cells and set them to be right justified.


Select each cell, click on the “>” symbol, and set the format string to show currency.


Add the Sum to the Footer

We have a column that shows the calculated cost of the shortage. Now we want to add the sum of this to the report.

First, we want to add a GroupFooter Band to the report, to have a place to hold the sum. This will put the sum at the end of the report for each assembly. (Note: you might add a “ReportFooter” instead of a GroupFooter – that is always at the end of the report. There isn’t much difference between them in most reports, unless you have multiple groups – then you should use a ReportFooter).

Right click on the Detail band, select Insert Band and then GroupFooter.


In the field list, find the ShortCost field and drag it to the GroupFooter.

Position the field to where you want it, resize the GroupFooter as appropriate.

Next, click on the < symbol again, click the ellipsis (…) by Summary.


Select the Group option in Summary Running. Also set the format string to the currency format.
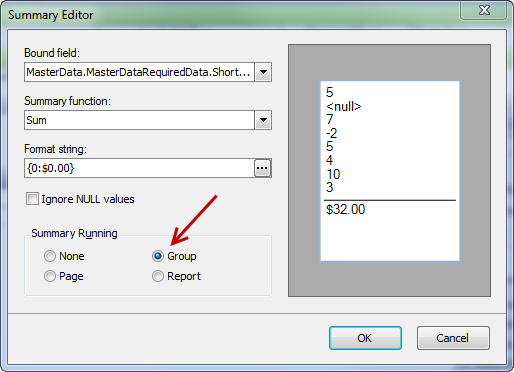
 

Click OK to close this window, then save your report with the File/Save As menu option and give it a name. Close the editor.

Here is our modified report, showing the unit cost for each item, the shortage cost per item, and a sum of the shortage cost at the bottom.
 

" Cannot Open/Create a parameter file" error

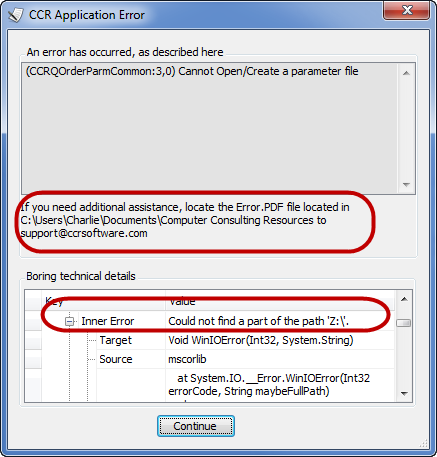
If you see an error message similar to the following:  (CCRQParmCommon:3,0) Cannot Open/Create a parameter file – there are several possible causes for the problem; Essentially, CCRSoftware programs store a parameter file named CCRQ.XML at a location that you specified (the “common location” or “common folder”). For some reason, either that location cannot be accessed or your Windows user account doesn’t have the proper permissions to access that location.

This location was specified the first time that you ran the CCRSoftware program on this computer. Note that in a multi user environment all users should be sharing this location as this is where we store your “preferences”, and where modified report templates are stored.

The details of the error are found in the Error.PDF file that the program creates – the location of this file is displayed in the error window. You can also find it by scrolling through the “boring technical details” section of the error window, but that may be more difficult to see.


Common Location Doesn’t Exist

The most common error occurs when the location of the file no longer exists. We usually see this when someone has reconfigured their network or workstation, or upgraded the version of Windows. For example, in the screen shot above, the program is looking for the CCRQ.XML file at the location “Z:\”, which is a networked drive. The error is “Could not find a part of the path.” Windows is saying that “Z:\” no longer exists. Another common detail message would the “The network path was not found” without specifying what that path is.

If you are told what the path is, one way to fix this is to recreate the drive mapping to Z:, and make sure it points to the correct shared location. This is the location where the CCRQ.XML file exists.

Another way to fix this is to tell the CCRSoftware product to look at another location. Select Help and then Tech Support, and then Reset Common Location. This will open a window that lets you pick the proper location. Again, you want to pick the location where CCRQ.XML exists.


After you reset the common location you must exit the CCRSoftware product and restart it.

If you are in a multi-user environment and other workstations are running the software correctly, you can use them to determine where the “common location” is. Go to one of those workstations, select Help and then Status, and scroll down to the Common Path line. This is the location where this workstation is looking to store the preference file.


Incorrect User Permissions

CCRSoftware products need the Common Location to be a place where you have read/write/create Windows file permissions. If you don’t have full permissions here, you will get a parameter file error. The Windows error in the error window will refer to user permissions.

The simplest fix for this is to give this user read/write/create file permissions at this location.

If that is not possible, you need to create a folder where all users CAN have that permission, move the CCRQ.XML file and any files with a file type of “repx” from the old location to the new location, and change the “common” location on each installation of the CCRSoftware product to point to that new location (use the Help/Tech Support menu option as shown above).

Resolving the "There is No Disk in the Drive" Error

If you see an error “There is no disk in the drive”  when you start CCRQBOM or CCRQInvoice, you have run into a bug that actually is in QuickBooks itself. It is very annoying, and we are not sure why Intuit hasn’t fixed this yet.

Essentially, QuickBooks is doing something that makes Windows search for removable drives on your system, and if one doesn’t have any media in it, you can get this error. This could be a floppy disk drive (remember those?), a removable hard disk drive, or one of those USB multi-card readers (the most common cause).

We aren’t sure why this happens sometimes and not others, and Intuit ignores any comments on this. We have shown them exactly what call in the programming interface that Intuit provides that will cause this problem.

There are several ways to resolve this, as outlined in the article in the Accountex Report blog: Fixing the There is no disk in the drive Error.
The two options that we recommend:

  • Disable the error message in your Registry: If you are comfortable with doing Windows registry patches, the article we reference above has details on how to make a patch that will stop this error from occurring. There are no side effects that we’ve seen. This is a simple change that takes just moments. Essentially it changes the reporting mechanism in Windows to stop this particular error from displaying that warning message.
  • Request an updated version of your CCRSoftware product: We have versions of CCRQInvoice and CCRQBOM that will automatically do the equivalent of that patch internally – turn off the warning message. The drawback to this is that these versions have not (at this time) been released into full production, they are pre-release test versions. If you wish to inquire about this, please enter a support ticket through this support system requesting the update, and we will provide you with details.